How to dual-boot Pear OS Panther 3 and Windows 7 PEAR OS

Diposting oleh Unknown on Minggu, 13 Mei 2012


Pear OS is a desktop Linux distribution based on Ubuntu, Desktop, but with a desktop appearance fashioned after the Mac OS X UI. A review of the latest edition, Pear OS Linux Panther 3, has already been published on this website (seePear OS Linux Panther 3 review).
This article presents a step-by-step guide on how to dual-boot Pear OS and Windows 7. To start, you need to download Pear OS Panther 3 from here and burn it to a CD or transfer it to a USB stick. The computer used for this article has a 500 GB hard drive with an existing installation of Windows 7, and it is assumed that you will also be attempting this on a computer that also has an existing installation of Windows 7.
The objective is to install Pear OS alongside Windows 7, so that whenever you reboot the computer, you are given the option to boot into windows 7 or Pear OS.
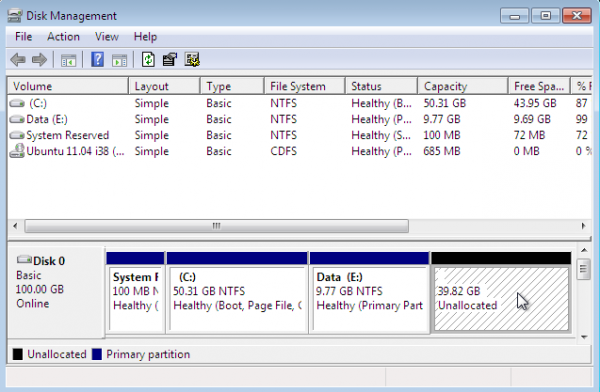
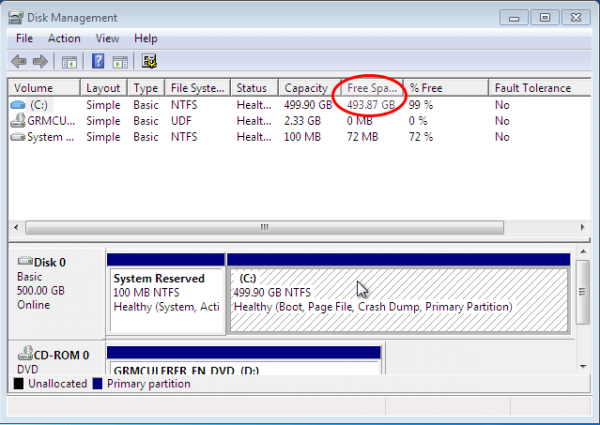
This screen shot show the partitions on the system as seen from Windows 7′s partition manager. Since there is no unpartitioned space left, the only way to install Pear OS alongside Windows 7 is to resize the C drive. That can be done from Windows or while installing Pear OS. For this tutorial, I chose the latter method. Any method you use will produce the same result. The key is to know how much free space is available. You can tell by looking at the “Free Space” column in Windows 7′s partition manager. That should give you an idea of how much space you can recover from Windows 7.
Windows 7 Partition Manager
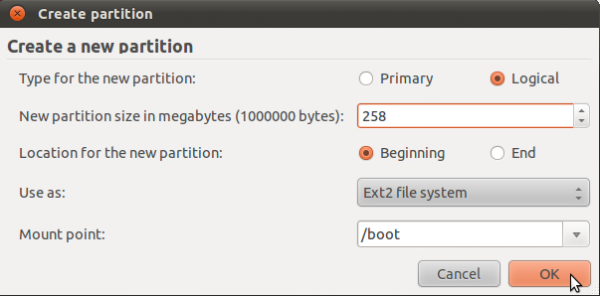
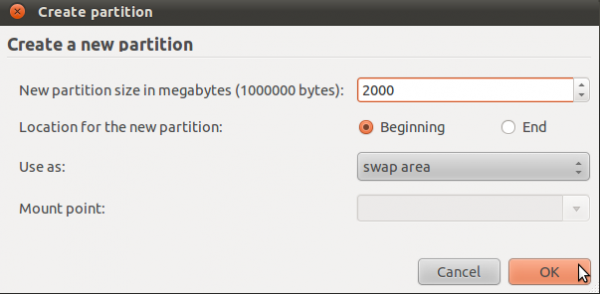
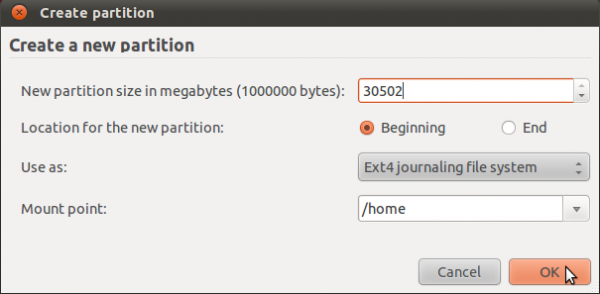
After resizing the Windows partition, you then create those partitions that will be used to install Pear OS. For this tutorial, three partitions will be created from the recovered disk space. They will be mounted at /boot, Swap and /, the root partition. You may also create a separate partition for /home, where your home folder will be located.
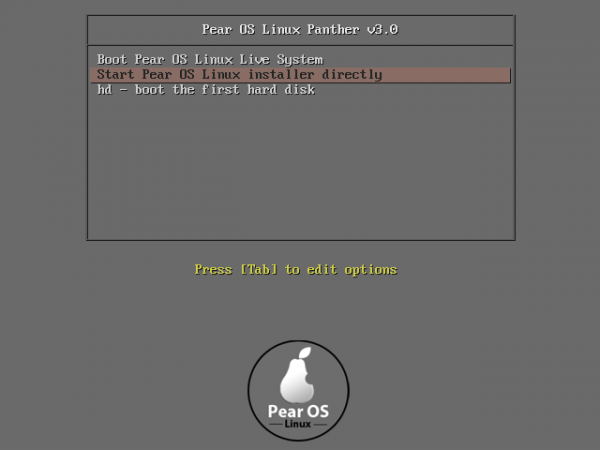
To start, boot the computer with the Pear OS installation CD in the optical drive. The boot menu is shown below. Though the second option gives the impression that you can boot directly to the installer from the boot menu, selecting the first or second option will actually boot into the Live desktop. From there, click on the “Install Pear OS” on the desktop to begin the installation process.
Pear OS Linux Panther 3 Boot Menu
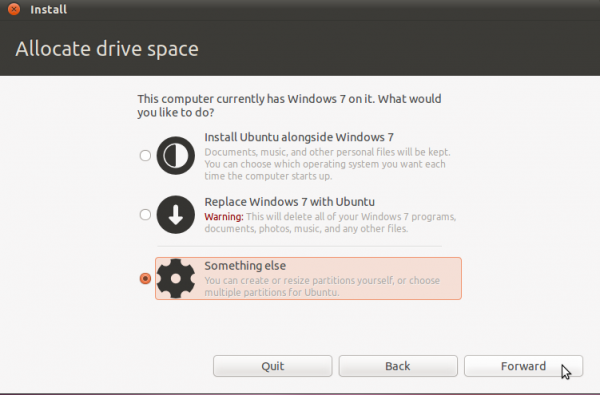
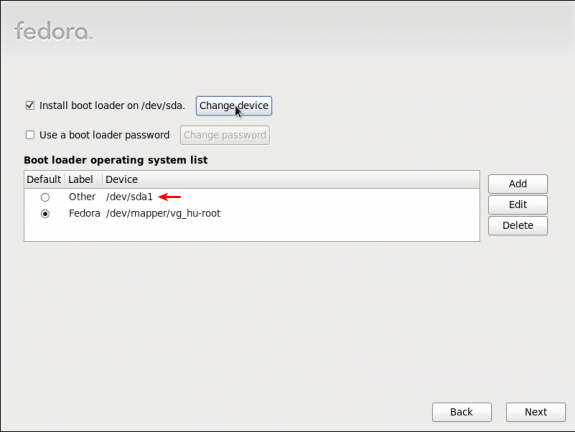
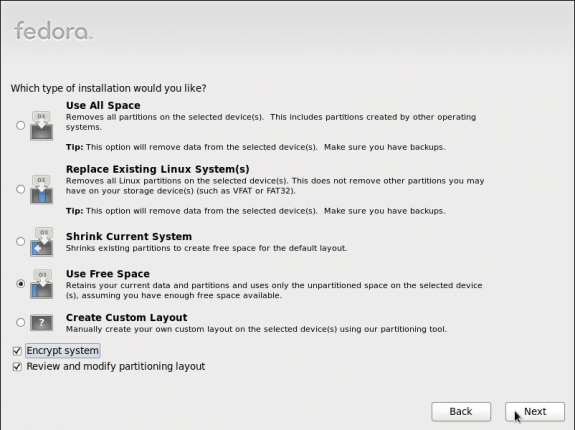
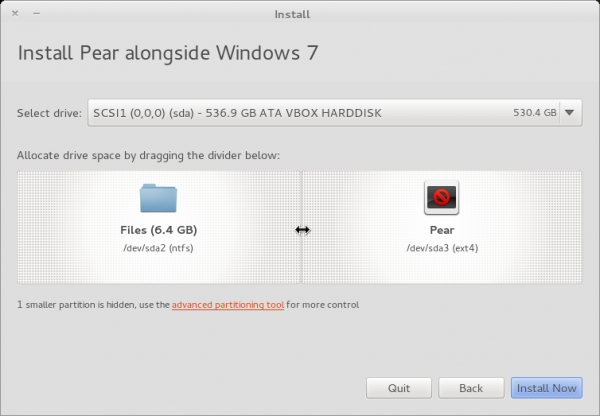
When the installer starts, click through the first two or three steps until you get to the one shown in the image below. Unless you intend to wipe or delete Windows from the hard drive, you will want to avoid the second option. Choosing the first option leads to an automated resizing of the Windows partition, but it does not give you the opportunity to install GRUB, the boot loader, in a location other than the Master Boot Record or MBR.
Pear OS 3 Partition Options
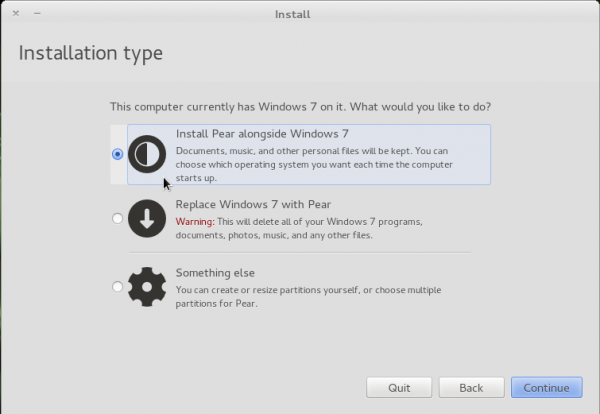
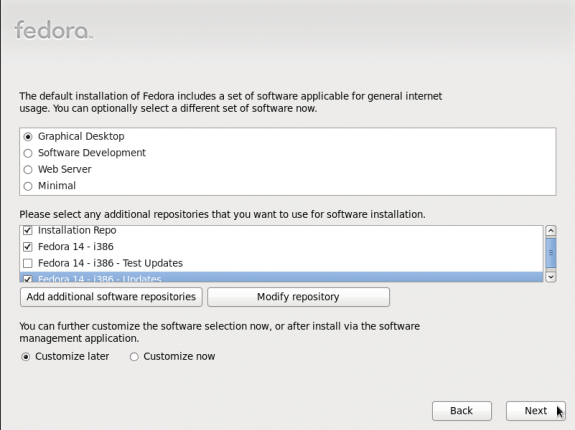
This screen shot shows the step after you choose the first option in the previous step. You can see how much disk space is used by Windows, and you can very easily resize the partition by dragging in between the two sections shown. But since the installer does not give you the opportunity to install the boot loader in a custom location, this is not the best route to take for this type of configuration. So, to continue with this tutorial, you can either click back to the previous page and select the last option – “Something else,” or click on the “advanced partitioning tool” link at this step.
Pear OS 3 Auto-Partition
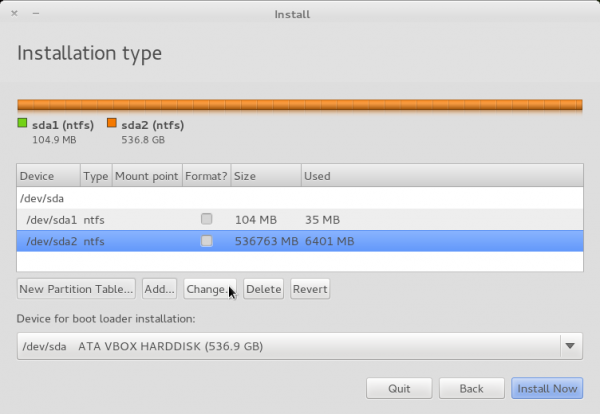
Either one brings you to the advanced partitioning tool. The tool is not really advanced in terms of features, it just means that you need a fundamental knowledge of disk partitioning in Linux to use it, or a good tutorial on the subject. If you are new to this, you might want to read guide to disks and disk partitions in Linux and tips for dual-booting Windows and Linux.
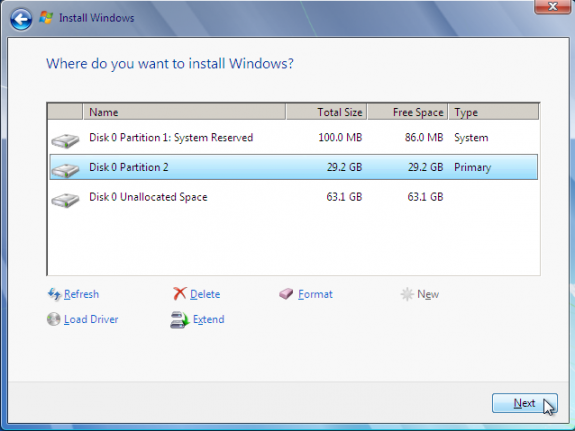
So, we already know what the objective is, which is to resize the Windows partition, and create three partitions from the recovered space for Pear OS installation. Note that because Windows has already used up two primary partitions, we only have two left to play with (the system does not allow more than four primary partitions). By using an extended partition, it is possible to create the three partitions that we need. But first things firsts; resize the Windows partition. To do that, select it as shown in this image, and click Change.
Pear OS 3 Advanced Partition
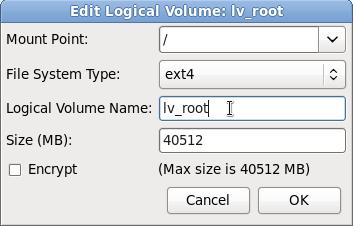
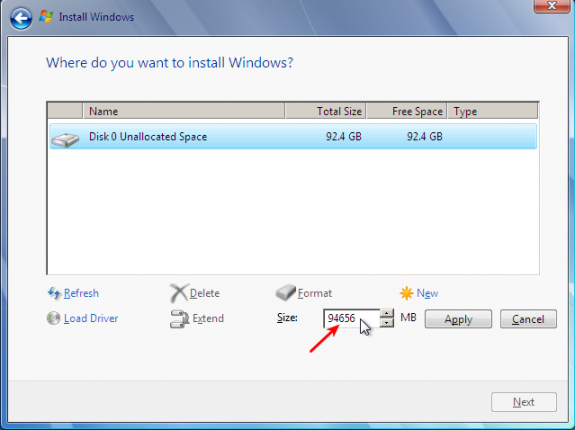
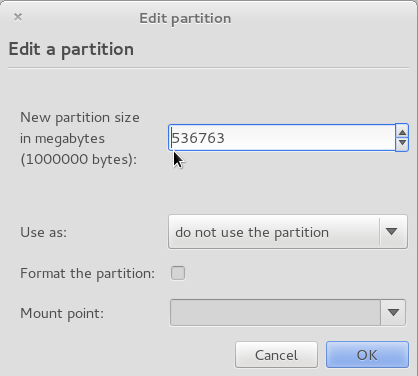
The edit partition window shows the total size of the partition. How much you choose to resize it by, is your decision. For this tutorial, I am splitting it in two; half to Windows 7, half to Pear OS.
Pear OS 3 Partition Editor
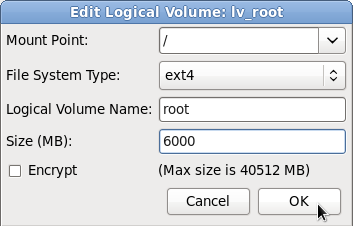
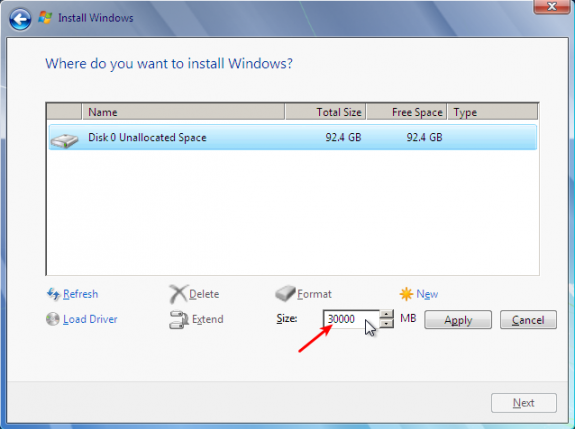
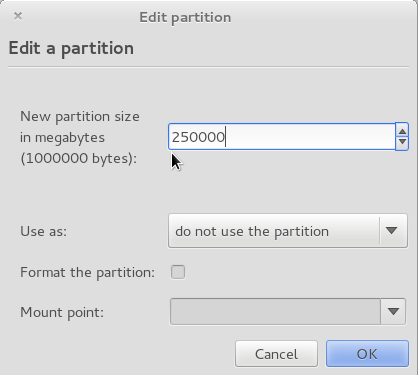
Here is the same screen after a new size has been specified. OK.
Pear OS 3 Resize Partition
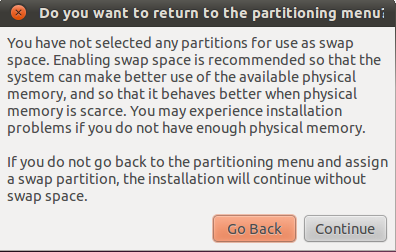
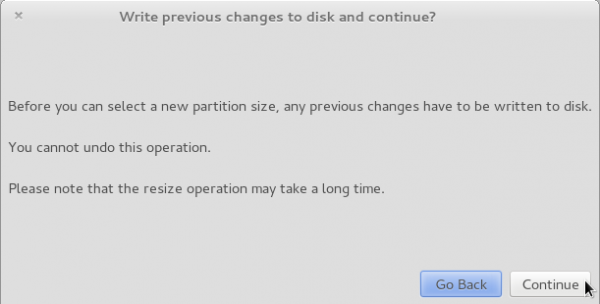
Just a friendly warning. Continue.
Pear OS 3 Installer Alert
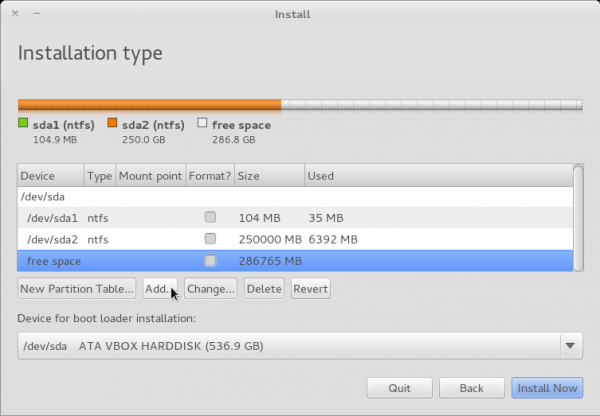
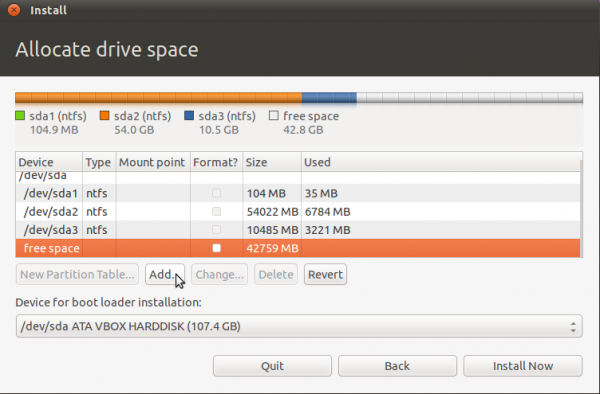
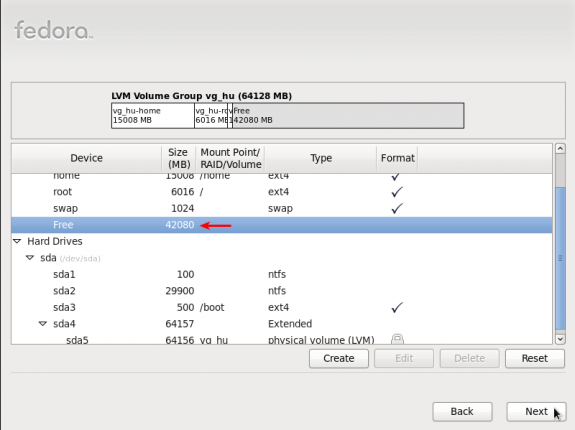
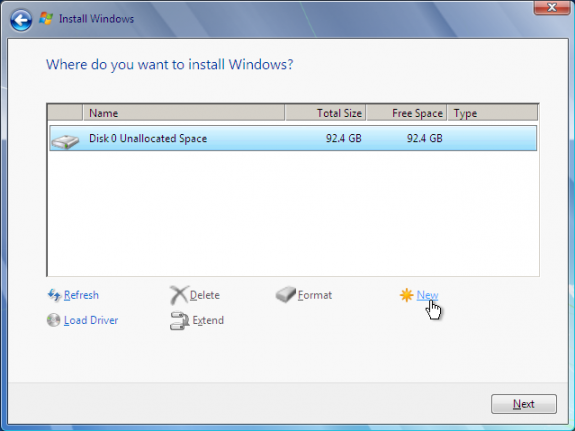
Back to the advanced partitioning tool, you can see the free space that has been recovered from the Windows partition. Time to start creating Pear OS partitions. Select the free space and click Add.
Pear OS 3 Add New Partition

More aboutHow to dual-boot Pear OS Panther 3 and Windows 7 PEAR OS

Dual-booting Linux Mint 10 KDE and Windows 7 MINT

Diposting oleh Unknown on Minggu, 06 Mei 2012


This is the latest article in the series on dual-booting Windows 7 and Linux distributions. It is intended for those new to Linux, and who might need some assistance installing Linux Mint 10 KDE side by side with Windows 7 on a computer with a single hard disk. Dual-booting is easy, but you must do it right or run the risk of messing up your Windows installation.
This article, like all the others, provides a step-by-step guide on how to do it right. To begin, you need to download a suitable installation image of Linux Mint 10 KDE for your platform. Then boot the computer from the DVD. The objective here is to install Linux Mint alongside Windows 7 in such a way that the Windows boot manager will be responsible for dual-booting both operating system, so that whenever the computer is (re)booted, you will be presented with the Windows boot menu, with the option to boot into Windows 7 or Linux Mint 10 KDE.
mintkde15
To reduce the number of images used in this tutorial, we begin at the step where disk partitioning starts.
These are the installer’s partitioning methods. The default method is to resize the Windows partition, freeing up enough space to install Linux Mint 10 KDE. The problem with choosing the default is that the installer will install GRUB, the boot loader, in the Master Boot Record (MBR) of the disk, overwriting the Windows boot file. That works, but it also means that when you upgrade Windows, it will return the favor, overwriting GRUB.
The recommended approach, one that will keep both operating systems and their boot programs properly segregated, is to install GRUB in the boot partition of the Linux Mint KDE installation. This approach ensures that whatever happens on the Windows side will not have any impact on the Linux Mint side and vice versa.
Because the default installation (of Linux Mint 10) does not create a separate boot partition, you will need to create one yourself. That means the best partitioning method to chose is “Specify partitions manually (advanced).” Select it and click on the Forward button.
mintkde
Here the installer presents all the partitions on the system. Because Windows is installed, the partitions will be NTFS partitions. The trick now is to free up some space for installing Linux Mint 10, and the only way to do that is to resize the partition. So, select the second NTFS partition, and click Change.
Note that is you have unpartitioned space already, you can just select it here. Also, if you have a second hard disk on the computer, and you wish to use it for installing Linux Mint 10 KDE, this would be the place to select it.
mintkde2
This is the original space of the Windows partition. What needs to be determined here is how much space do you want to “steal” from Windows.
mintkde3
This will be the new size for the Windows partition. Yours will, of course, be different. You know best how much space you can allocate. The size is the only thing you need to change here. Changing any other thing will likely mess up your Windows installation. OK.
mintkde4
Now that some space has been freed up, select it and then click Add to start creating partitions for Linux Mint 10 KDE. This step will have to be repeated for all the partitions you will need to create. A default installation creates just two partitions. One for /, where every other file system is located, and the second for swap space. However, it is recommended, even for a desktop system, to create a separate partition for /home, where all user home directories will be located. Because this is for dual-booting, it is also necessary to create a separate partition for /boot, where all the boot loader-related files will be located. OK.
mintkde5
The first partition will be the boot partition. The installer will attempt to create it as a logical partition, which is just fine. 250 MB should be more than enough, and I have chosen to use ext2 for file system. This is my choice. The default is ext4, a journaling file system. OK.
mintkde6

More aboutDual-booting Linux Mint 10 KDE and Windows 7 MINT

How to dual-boot Windows 7 and Ubuntu 11.04 DUAL-BOOT

Diposting oleh Unknown on Selasa, 01 Mei 2012


For those Windows users who have discovered what Linux has to offer, but for one reason or another are not ready to completely abandon Windows, dual-booting between the two operating systems is one method of keeping a foot in both worlds. And to help those users, this article presents a step-by-step guide on how to configure dual-booting between Windows 7 and Ubuntu 11.04 on a computer with one hard drive. The same steps may be used to dual-boot both between both systems on a computer with two hard drives.
In attempting to dual-boot between Windows 7 and Ubuntu 11.04, you will either install Windows anew, then install Ubuntu 11.04 alongside it, or install Ubuntu 11.04 alongside an existing installation of Windows. This tutorial uses as example, a case of installing Ubuntu 11.04 on an existing installation of Windows 7.
As shown in the image below, the existing installation of Windows 7 used for this tutorial has three primary partitions. And because of the limitations of the MBR partitioning scheme, only one primary partition is available for installing Ubuntu 11.04. By using an extended partition, we can configure as many partitions as we need for Ubuntu.
dualBoot3
To begin, boot the computer using a Ubuntu 11.04 CD or DVD. At the disk partitioning step, the installer will present several options. Because the installer will not automatically partition and configure the free space, using the installer’s advanced partitioning tool is the only method of creating the necessary partitions. To launch the advanced tool, select the “Something else” option, the click Forward.
dualBoot4
This is Ubuntu’s advanced partitioning tool and the detected partitions. The first three partitions are obviously the ntfs partitions that we saw in the first image. Because there are three existing primary partition, the last partition will have to be an extended partition, under which logical partitions for installation of Ubuntu will be configured.
By default, Ubuntu’s installer configures two partitions – the first for /, the root directory, and the second for Swap. When creating partitions for installing any desktop Linux distribution, my recommendation is to create the following four partitions:
  • /boot, the boot partition. This is where programs critical for booting the system will reside.
  • /, the root directory. The bulk of the programs used for running the system will be installed here.
  • Swap, unformatted disk space for use as virtual memory.
  • /home, the partition where your home directory will be located. In the course of using the system, files and folders you create will reside in various folders here.
So, to start setting up these partitions, select the free space and click on Add. Note that this step will have to be repeated for all the partitions.
dualBoot5
The first partition will be for /boot. When setting up an LVM-based system using an Alternate Installer ISO image, the default disk space allocated to /boot is 258 MB. However, only about 22 MB of that is used, so anything thing between that size range will do. For this tutorial, the default will be used. The mount point will, of course, be /boot. The default file system is ext2. OK.
dualBoot6
The second partition will be for Swap. It is possible to install Ubuntu without Swap. However, if you attempt to do that, the installer will try to discourage you with the following warning:
swapwarn
For the record, I have been able to install Ubuntu 11.04 successfully without Swap. The sky has not fallen yet, but I have not tried to put the system in Suspend or Hibernate mode. In any case, save yourself a load of trouble and configure Swap. The suggested size for Swap is 2000 MB. Select “swap area” from the “Use as” dropdown menu. OK.
dualBoot7
The third partition will be for /, the root directory. The default journaling file system on Ubuntu 11.04 is ext4. You may stick with it or choose another journaling file system available. Btrfs is supported, but this partitioning scheme is not for btrfs. If you are interested, how to install Ubuntu 11.04 on a btrfs file system is a good place to start.
The installer recommends a minimum of 4.4 GB for Ubuntu 11.04, but on a new installation, less than 3 GB of disk space allocated to / is used. Note that as you install additional applications after installation, disk space used will grow, so be generous here. I think 10 GB should be more than enough. OK.
dualBoot8
The last partition will be for /home. The file system is ext4, and you may allocate all available disk space to it. OK.
dualBoot9
More aboutHow to dual-boot Windows 7 and Ubuntu 11.04 DUAL-BOOT

How to dual-boot Fedora 14 and Windows 7 FEDORA Part 4

Diposting oleh Unknown on Selasa, 24 April 2012


When in the Add New Entry tab, click on the Linux tab as shown. The two entries that we need to tweak here are in the Type and Device dropdown menus. Since Fedora 14 uses GRUB Legacy as the boot loader, select that in the Type menu. Then select the partition you installed GRUB into from the Device menu. In this example, GRUB (Legacy) was installed on the third primary partition, /dev/sda3, which is the /boot partition of the Fedora installation. With those completed, click on Add Entry, then on the Edit Menu tab to see what the new Windows boot menu looks like.
BCD1
Adding an entry
These are the entries after adding Fedora to the boot menu. Notice that Windows 7 is the default and on every reboot, the computer will boot into Windows 7 after 30 seconds has elapsed. You may want to change the Linux entry from NeoSmart Linux to Fedora 14. To do so, highlight it and click Rename.
BCD2
Windows 7 default bootloader
This is the edited boot menu, with NeoSmart Linux changed to Fedora 14, and Fedora 14 set as the default. The default boot time is 30 seconds. You may change that to a value that suits you. “Skip the boot menu” is one option you want to keep disabled. Click Save Settings and reboot the computer.
BCD3
Edited bootloader

Now every time the computer is rebooted, the Windows Boot Manager’s menu will offer the option to boot Fedora 14 or Windows 7. You may now boot into Fedora 14 and complete the second stage of the installation process.
BCD4
Windows bootloader options
Note that while this method of dual-booting Windows and a Linux distribution solves one problem, I think it creates another one. And that problem, for me at least, is that there is no option to password-protect the Windows 7 Boot Manager. It is a trade of, but one I will never have to make, because I do not use Windows.
Resources: Download a Fedora 14 installation image from here, and EasyBCD from here.

More aboutHow to dual-boot Fedora 14 and Windows 7 FEDORA Part 4

How to dual-boot Fedora 14 and Windows 7 FEDORA Part 3

Diposting oleh Unknown


The next step relevant to this tutorial is the boot loader configuration step. The boot loader used by Fedora 14 is GRUB Legacy. By default, it is installed in the Master Boot Record (MBR). What we want to do here is install it some place else, and the best alternative location to install GRUB, the GRand Unified Bootloader, is in the /boot partition (/dev/sda3) of the Fedora installation. The reason behind this choice of location is this: If it is installed in the usual location, Windows will likely overwrite parts of it the next time you upgrade/update Windows.
To change the location, click on Change device.
fedwinDl9
GRUB settings
Then click on the second radio button to choose installation in to the “First sector of boot partition – /dev/sda3.” OK.
fedwinDl10
Alternate GRUB location

With the GRUB location changed, click on Next to continue.
fedwinDl11
GRUB configuration
This step is not really relevant to this tutorial, but I just included it to show that if you are using the DVD installation image, the installer gives you the option to customize packages for installation. Next.
fedwinDl12
Package selection
When the first step of the installation has completed, and you reboot, the computer will boot into Windows 7. Why? Because the Windows loader in installed in the MBR, and is not aware that another OS now resides on the same disk. The task then is to edit the Windows 7 Boot Manager to include an entry for Fedora 14. Since I do know very little about Windows, and have never actually used Windows 7, other than for writing these tutorials, I found a very easy to use software that makes editing the Windows 7 Boot Manager very easy.
That software is called EasyBCD by NeoSmart Technologies. It is a free application and you can download it from here. Install it as you would any other Windows application. After installation, there should be an entry for it in the menu and on the desktop. Launch it and you should see the default boot menu. Notice that there is only one entry, and it is for Windows 7. The next task is to edit it to add an entry for Fedora 14. Click on the Add New Entry tab to begin.
BCD
EasyBCD
More aboutHow to dual-boot Fedora 14 and Windows 7 FEDORA Part 3

How to dual-boot Fedora 14 and Windows 7 FEDORA Part 2

Diposting oleh Unknown


These are the partitions and logical volumes created by Anaconda, the Fedora installer. Notice that the first two (primary) partitions, /dev/sda1 and /dev/sda2, are the Windows 7 partitions. Anaconda creates a third primary partition, /dev/sda3, for /boot, and a fourth (extended) partition is initialized for use by LVM, the Linux Logical Volume Manager. Three logical volumes are created, one each for /, swap, and /home.
By looking at the sizes of the logical volumes, and knowing that a new installation of Fedora 14 takes up less than 4 GB of disk space, you can see that the logical volumes sizes can be reduced to free up disk space. After installation, the unallocated space can then be used to create new logical volumes, or grow an existing one. To edit a logical volume, select and click on Edit, or just double-click it.
fedwinDl6
Default Fedora 14 partitions
The first logical volume chosen for editing is lv_root. The allocated size can be reduced by up to a factor of ten and still have enough disk space to install Fedora 14. The name can be edited to root, from the default of lv_root.
fedwin6
Default root LV
Here is the edited version. Notice the new size and new name. OK.
fedwin7
Edited root LV
Next for editing is lv_swap. I think the default size is just fine. The name, however, I will edit.
fedwin8
Default swap LV
Here is the edited version for swap. OK.
fedwin9
Edited swap LV
The last logical volume to edit is lv_home. As for the previous two logical volumes, only the size and name are going to be edited.
fedwin10
Default /home LV
And the for last time, here is the edited version. OK.
fedwin11
Edited /home LV
With all logical volumes edited, you can see the disk space that has been freed up. That will be used to grow (resize) logical volumes or create new ones if the need arises. Click Next to continue with the rest of the installation.
fedwinDl7
Free space
If you enabled “Encrypt system,” the installer will prompt you to specify an encryption passphrase. This will be used to encrypt the disk, and will be required to unlock it at every boot up.
fedwinDl8
Specify disk encryption password
More aboutHow to dual-boot Fedora 14 and Windows 7 FEDORA Part 2

How to dual-boot Fedora 14 and Windows 7 FEDORA Part 1

Diposting oleh Unknown


How to dual-boot Fedora 14 and Windows 7 is next in a series of articles on dual-booting Windows and Linux distributions. The first was how to dual boot Ubuntu 10.10 and Windows 7. That article gave detailed instructions on how to dual-boot, with GRUB, the Linux bootloader, installed on the Master Boot Record (MBR) of the hard disk. This article will show how to dual-boot by letting the Windows Boot Manager take care of the dual-booting responsibilities. The method used here is a lot easier than that suggested by a commenter here. The actual reason behind this approach is to prevent Windows from messing with GRUB when it (Windows) is updated/upgraded.
The first task is to create Windows partitions, leaving some unallocated space for installing Fedora 14. When dual-booting Windows and Linux, this is the recommended method. It is safer than exposing the whole disk to Windows and letting the Linux installer make room for installing Linux by shrinking the space used by Windows. Note: To make taking screenshots a lot easier, the images used in this tutorial came from a virtual installation, with a disk space of about 92 GB.

You might also be interested in how to dual-boot Windows 7 and Fedora 14 on a computer with two hard drives.
To start, boot the computer using the Windows 7 installation disk. The disk partitioning step is shown in the image below. To create the Windows partitions, click on New.
fedwinDl
Disk under Windows installer
The available size of the hard drive will be presented in an editable field. Knowing that a new installation of Windows 7 takes up about 7 GB of disk space, any value higher than this should be sufficient. For this tutorial, I chose to allocate 30 GB to Windows.
fedwinDl1
Edit partition size
Here is the new size for Windows. Click Apply.
fedwinDl2
Specify partition size
The Windows partitioner will create two partitions. The first, 100 MB in size, is for the /boot partition, and the second is the main Windows 7 partition. The unallocated space will be used for installing Fedora 14. Click Next to install Windows.
fedwinDl4
Continue installation
After Windows installation has completed, reboot into the Fedora 14 installation CD or DVD. For this tutorial, I used the DVD installation image. Click until you get to the step shown in the image below. Because the disk has been partitioned to create a free space, untouched by Windows, the option to select here is “Use Free Space.” If you want to add a physical security layer to your Fedora 14 installation, enable “Encrypt system.” See how Fedora protects your computer with full disk encryption for the benefit of this option.
fedwinDl5
Fedora 14 partition methods
More aboutHow to dual-boot Fedora 14 and Windows 7 FEDORA Part 1