How to dual-boot Fedora 14 and Windows 7 FEDORA Part 4

Diposting oleh Unknown on Selasa, 24 April 2012


When in the Add New Entry tab, click on the Linux tab as shown. The two entries that we need to tweak here are in the Type and Device dropdown menus. Since Fedora 14 uses GRUB Legacy as the boot loader, select that in the Type menu. Then select the partition you installed GRUB into from the Device menu. In this example, GRUB (Legacy) was installed on the third primary partition, /dev/sda3, which is the /boot partition of the Fedora installation. With those completed, click on Add Entry, then on the Edit Menu tab to see what the new Windows boot menu looks like.
BCD1
Adding an entry
These are the entries after adding Fedora to the boot menu. Notice that Windows 7 is the default and on every reboot, the computer will boot into Windows 7 after 30 seconds has elapsed. You may want to change the Linux entry from NeoSmart Linux to Fedora 14. To do so, highlight it and click Rename.
BCD2
Windows 7 default bootloader
This is the edited boot menu, with NeoSmart Linux changed to Fedora 14, and Fedora 14 set as the default. The default boot time is 30 seconds. You may change that to a value that suits you. “Skip the boot menu” is one option you want to keep disabled. Click Save Settings and reboot the computer.
BCD3
Edited bootloader

Now every time the computer is rebooted, the Windows Boot Manager’s menu will offer the option to boot Fedora 14 or Windows 7. You may now boot into Fedora 14 and complete the second stage of the installation process.
BCD4
Windows bootloader options
Note that while this method of dual-booting Windows and a Linux distribution solves one problem, I think it creates another one. And that problem, for me at least, is that there is no option to password-protect the Windows 7 Boot Manager. It is a trade of, but one I will never have to make, because I do not use Windows.
Resources: Download a Fedora 14 installation image from here, and EasyBCD from here.

More aboutHow to dual-boot Fedora 14 and Windows 7 FEDORA Part 4

How to dual-boot Fedora 14 and Windows 7 FEDORA Part 3

Diposting oleh Unknown


The next step relevant to this tutorial is the boot loader configuration step. The boot loader used by Fedora 14 is GRUB Legacy. By default, it is installed in the Master Boot Record (MBR). What we want to do here is install it some place else, and the best alternative location to install GRUB, the GRand Unified Bootloader, is in the /boot partition (/dev/sda3) of the Fedora installation. The reason behind this choice of location is this: If it is installed in the usual location, Windows will likely overwrite parts of it the next time you upgrade/update Windows.
To change the location, click on Change device.
fedwinDl9
GRUB settings
Then click on the second radio button to choose installation in to the “First sector of boot partition – /dev/sda3.” OK.
fedwinDl10
Alternate GRUB location

With the GRUB location changed, click on Next to continue.
fedwinDl11
GRUB configuration
This step is not really relevant to this tutorial, but I just included it to show that if you are using the DVD installation image, the installer gives you the option to customize packages for installation. Next.
fedwinDl12
Package selection
When the first step of the installation has completed, and you reboot, the computer will boot into Windows 7. Why? Because the Windows loader in installed in the MBR, and is not aware that another OS now resides on the same disk. The task then is to edit the Windows 7 Boot Manager to include an entry for Fedora 14. Since I do know very little about Windows, and have never actually used Windows 7, other than for writing these tutorials, I found a very easy to use software that makes editing the Windows 7 Boot Manager very easy.
That software is called EasyBCD by NeoSmart Technologies. It is a free application and you can download it from here. Install it as you would any other Windows application. After installation, there should be an entry for it in the menu and on the desktop. Launch it and you should see the default boot menu. Notice that there is only one entry, and it is for Windows 7. The next task is to edit it to add an entry for Fedora 14. Click on the Add New Entry tab to begin.
BCD
EasyBCD
More aboutHow to dual-boot Fedora 14 and Windows 7 FEDORA Part 3

How to dual-boot Fedora 14 and Windows 7 FEDORA Part 2

Diposting oleh Unknown


These are the partitions and logical volumes created by Anaconda, the Fedora installer. Notice that the first two (primary) partitions, /dev/sda1 and /dev/sda2, are the Windows 7 partitions. Anaconda creates a third primary partition, /dev/sda3, for /boot, and a fourth (extended) partition is initialized for use by LVM, the Linux Logical Volume Manager. Three logical volumes are created, one each for /, swap, and /home.
By looking at the sizes of the logical volumes, and knowing that a new installation of Fedora 14 takes up less than 4 GB of disk space, you can see that the logical volumes sizes can be reduced to free up disk space. After installation, the unallocated space can then be used to create new logical volumes, or grow an existing one. To edit a logical volume, select and click on Edit, or just double-click it.
fedwinDl6
Default Fedora 14 partitions
The first logical volume chosen for editing is lv_root. The allocated size can be reduced by up to a factor of ten and still have enough disk space to install Fedora 14. The name can be edited to root, from the default of lv_root.
fedwin6
Default root LV
Here is the edited version. Notice the new size and new name. OK.
fedwin7
Edited root LV
Next for editing is lv_swap. I think the default size is just fine. The name, however, I will edit.
fedwin8
Default swap LV
Here is the edited version for swap. OK.
fedwin9
Edited swap LV
The last logical volume to edit is lv_home. As for the previous two logical volumes, only the size and name are going to be edited.
fedwin10
Default /home LV
And the for last time, here is the edited version. OK.
fedwin11
Edited /home LV
With all logical volumes edited, you can see the disk space that has been freed up. That will be used to grow (resize) logical volumes or create new ones if the need arises. Click Next to continue with the rest of the installation.
fedwinDl7
Free space
If you enabled “Encrypt system,” the installer will prompt you to specify an encryption passphrase. This will be used to encrypt the disk, and will be required to unlock it at every boot up.
fedwinDl8
Specify disk encryption password
More aboutHow to dual-boot Fedora 14 and Windows 7 FEDORA Part 2

How to dual-boot Fedora 14 and Windows 7 FEDORA Part 1

Diposting oleh Unknown


How to dual-boot Fedora 14 and Windows 7 is next in a series of articles on dual-booting Windows and Linux distributions. The first was how to dual boot Ubuntu 10.10 and Windows 7. That article gave detailed instructions on how to dual-boot, with GRUB, the Linux bootloader, installed on the Master Boot Record (MBR) of the hard disk. This article will show how to dual-boot by letting the Windows Boot Manager take care of the dual-booting responsibilities. The method used here is a lot easier than that suggested by a commenter here. The actual reason behind this approach is to prevent Windows from messing with GRUB when it (Windows) is updated/upgraded.
The first task is to create Windows partitions, leaving some unallocated space for installing Fedora 14. When dual-booting Windows and Linux, this is the recommended method. It is safer than exposing the whole disk to Windows and letting the Linux installer make room for installing Linux by shrinking the space used by Windows. Note: To make taking screenshots a lot easier, the images used in this tutorial came from a virtual installation, with a disk space of about 92 GB.

You might also be interested in how to dual-boot Windows 7 and Fedora 14 on a computer with two hard drives.
To start, boot the computer using the Windows 7 installation disk. The disk partitioning step is shown in the image below. To create the Windows partitions, click on New.
fedwinDl
Disk under Windows installer
The available size of the hard drive will be presented in an editable field. Knowing that a new installation of Windows 7 takes up about 7 GB of disk space, any value higher than this should be sufficient. For this tutorial, I chose to allocate 30 GB to Windows.
fedwinDl1
Edit partition size
Here is the new size for Windows. Click Apply.
fedwinDl2
Specify partition size
The Windows partitioner will create two partitions. The first, 100 MB in size, is for the /boot partition, and the second is the main Windows 7 partition. The unallocated space will be used for installing Fedora 14. Click Next to install Windows.
fedwinDl4
Continue installation
After Windows installation has completed, reboot into the Fedora 14 installation CD or DVD. For this tutorial, I used the DVD installation image. Click until you get to the step shown in the image below. Because the disk has been partitioned to create a free space, untouched by Windows, the option to select here is “Use Free Space.” If you want to add a physical security layer to your Fedora 14 installation, enable “Encrypt system.” See how Fedora protects your computer with full disk encryption for the benefit of this option.
fedwinDl5
Fedora 14 partition methods
More aboutHow to dual-boot Fedora 14 and Windows 7 FEDORA Part 1

Dual-booting Windows 7 and Ubuntu 10.10

Diposting oleh Unknown


This is the second article on dual-booting Windows 7 andUbuntu 10.10 on a computer with one hard disk. The first,how to dual-boot Ubuntu 10.10 and Windows 7, showed how to accomplish the task with GRUB 2, the boot loader used by Ubuntu, installed on the Master Boot Record (MBR) of the hard disk. That is, GRUB is responsible for the dual-booting task. The problem with that configuration is that GRUB files tend to be overwritten when you upgrade Windows. To get around that problem, the recommended method is to install GRUB not on the MBR, but on the boot partition of Ubuntu.
That is the purpose of this tutorial. To show how to dual-boot Windows 7 and Ubuntu 10.10 where the Windows Boot Manager is responsible for dual-booting both Operating systems.
Note that this tutorial assumes installation on a computer with an existing installation of Windows 7. Here are the tasks involved:
  • Download Ubuntu – Ubuntu 10.10 Desktop edition is used for this tutorial
  • Install Ubuntu – the key point at this step is to remember to install GRUB in the boot partition
  • After installation, boot into Windows and download and install EasyBCD. Use EasyBCD to add an entry for Ubuntu in the Windows boot menu
The result is shown below. Any time you reboot the computer, the Windows boot menu will give you the option to boot into either Windows 7 or Ubuntu 10.10. Note that with this configuration, you will still have access to the GRUB menu, if you decide to boot into Ubuntu.
winbuntu15
Now, lets start. To reduce the number of images used, the tutorial begins at the disk partitioning step. You have three options. The first might seem like the best option, but if you select that, you will have no say on where GRUB is installed. The installer will actually install GRUB in the MBR, overwriting the Windows boot files. The second option is obviously out of the question. That leaves the last option, and that is the option you want to select. So, select it and click Forward.
winbuntu2
The images used in this tutorial were obtained from a test installation in a virtual environment with about 100 GB of disk space. The default partitions created by Windows are shown below. The first, /dev/sda1, is the system partition. The second, /dev/sda2, is the data partition. To install Ubuntu, we are going to resize this data partition, and install Ubuntu in the reclaimed space. How much space can we reclaim? It depends on the amount of space used by Windows (the last column in the image gives you that figure). For this installation, you can see that I can reclaim a sizable chunk of the space left. To resize the partition, select it and click the Change button.
winbuntu3
For this tutorial, I am going to reduce the partition’s size by about 56 GB. The remaining space should be more than enough for Windows 7. By how much you reduce your own partition will, of course, depend on the size of the disk you are working with.
winbuntu18
This is the final cut. Note that the size is the only thing you change. Do not change any other thing or you will likely hose your Windows installation. OK.
This is just a friendly warning. Continue.
winbuntu4
With the free space reclaimed from the Windows partition, now you can start creating partitions for Ubuntu. Select the free space as shown and click Add. Note that you will have to repeat this step for all the partitions you will be creating.
For this tutorial, four partitions will be created. These will be used for /boot, /, swap, and /home file system directories. You can create as many partitions as you need, but for a typical desktop, these will be sufficient.
winbuntu5

More aboutDual-booting Windows 7 and Ubuntu 10.10

Dual boot Ubuntu and Windows 7

Diposting oleh Unknown


1. Introduction

You need Windows for a program you use for work, your favorite game runs only on Windows or you are a developer that works on some cross-platform project. And of course, you can't even think about giving up your favorite OS. Whatever the reason, you need Windows and a virtual machine won't cut it so all you're left with, if you don't have a spare machine, is dual-boot. I usually recommend against multiple-boot machines, but I can't argue with the fact that here are situations when the idea is very useful. So this is what this article is about: making sure you need a dual-boot system, acknowledging the requirements, making backups if need be and proceed. You are expected to have some experience in installing Windows as well as Linux, at least Ubuntu in this case, and some courage. But first let's make some concepts clear. And before we begin, we want to invite you to our forums to get help or discuss how and why you use multiple boot setups.

2. Concepts

We don't want to lie to you: any task that involves advanced partitioning schemes isn't for the faint of heart. But it isn't rocket science either, and we're here to help you. Various operating systems have various partitioning schemes but since the partitioning concepts of the PC are so "smart", there are some things you should know. Every OS that I know of that is installable on the PC requests a primary partition to boot from. Linux is the most flexible in this respect, as you can have its' /boot or / on a logical partition, but I'm not so sure if your BIOS will be able to boot from it. Windows, Solaris and the BSDs absolutely demand primary partitions, with Windows being the most "oppressive" in that respect. So whenever you install a dual-boot system with Windows involved, install it first, as it won't ask you and overwrite the MBR. If you want to dual-boot Linux and BSD or Solaris, install Linux first. Now that we settled this, we will insist you make backups if you have other partitions on the target disk, and you still need them. Our setup will start with a blank drive, and we'll show you how it's done.

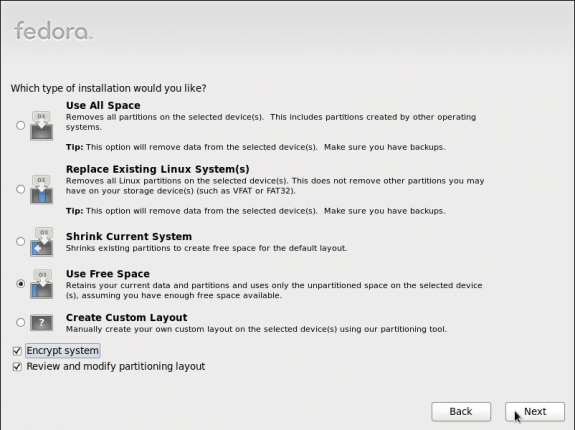
3. Installing Windows 7

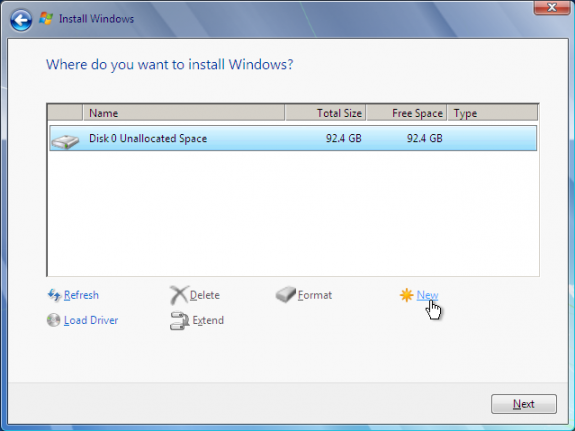
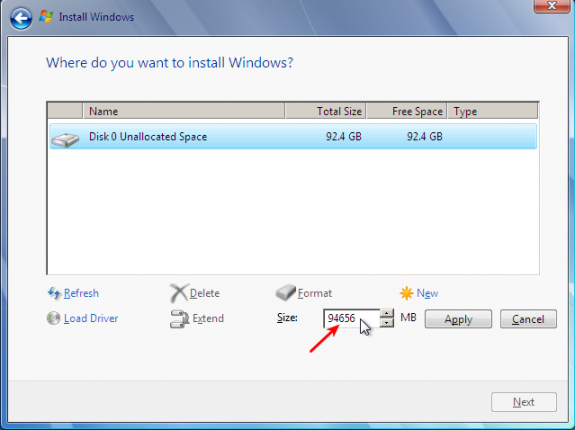
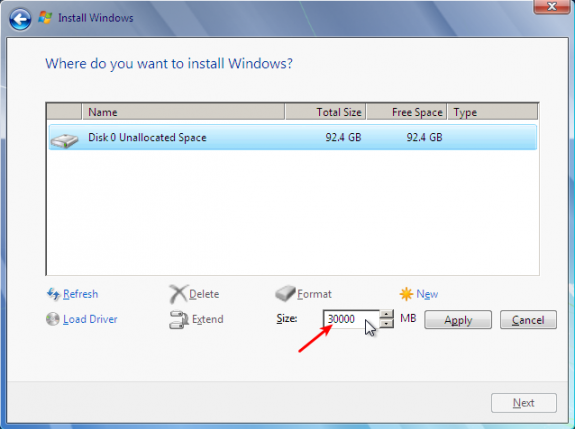
As said, you need to install Windows first, and this is more than an advice, and it doesn't apply only to Windows 7 either. We suggest you don't try over-complicated setups, because your chances of having a system actually up and running in decent time are decreasing rapidly that way. Take note that this article is not a step-by-step how-to on installing Windows 7 and/or Ubuntu. We will only refer to the parts that involve partitioning for a successful dual-boot experience. So, when you will get to Windows' partitioning screen, here's a screenshot for you to get an idea:
Windows 7 partitioning
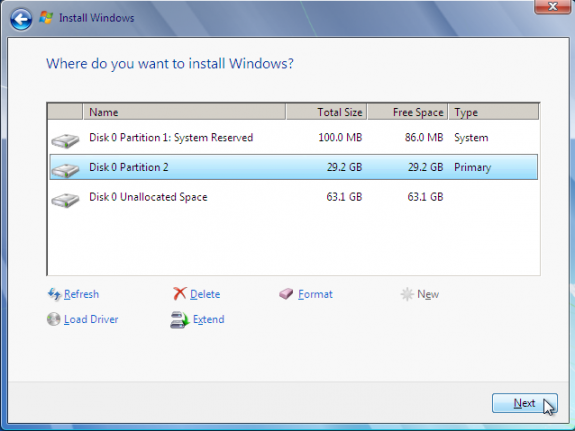
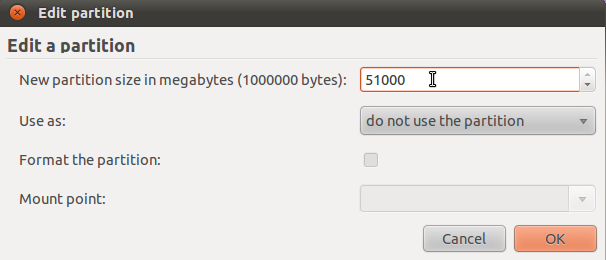
So, since Windows asks for a minimal primary partition size of more than 12 GB (!) , I gave it that, it auto-created it's system one and left me the rest of the disk empty and blank. After installing finished successfully, I was prepared for the tricky part: installing Linux. No, I'm just kidding, it's as simple as it can be.

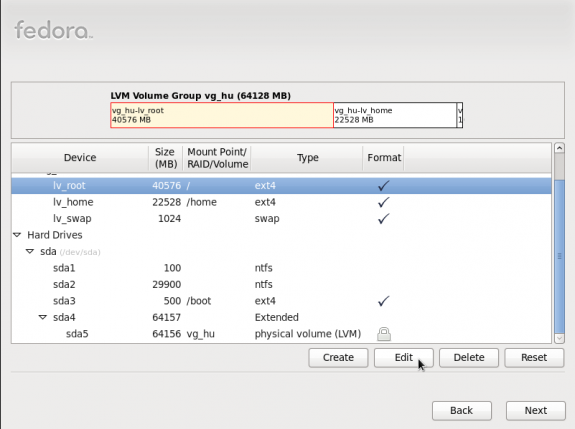
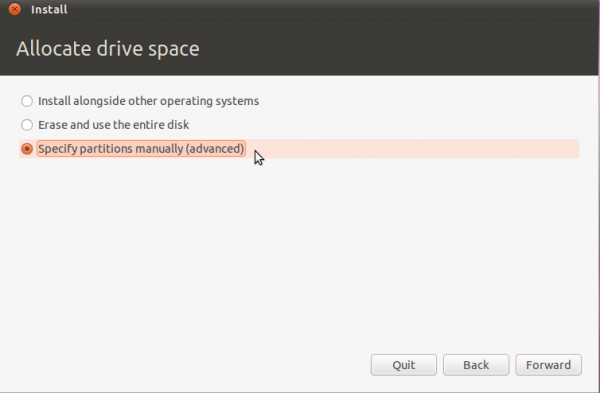
4. Installing Ubuntu

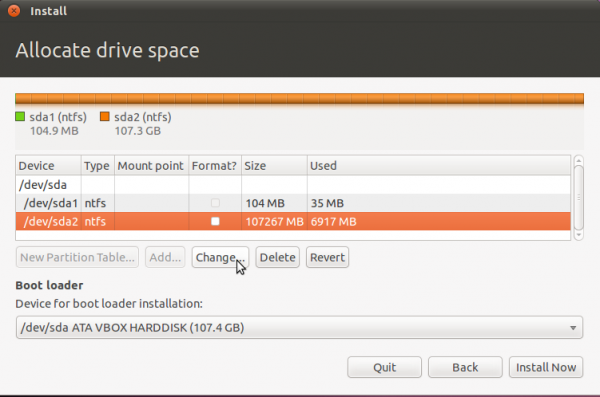
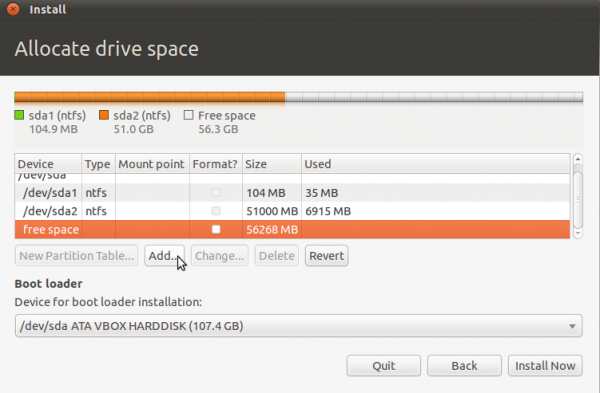
We chose Ubuntu for it's popularity, but the idea is the same regarding of distribution: sda1 and sda2 are Windows, sda3 is Linux / or /boot, marked as bootable (very important!) and the rest of the disk is yours to use as you please. This only applies if using Win7, because Windows XP, for example, doesn't ask for a separate system partition, so you have another primary partition available for yet another operating system. Maybe there's a way to do without a system partition in Windows 7, but I'm not a Windows guru, so if anyone knows, tell us.
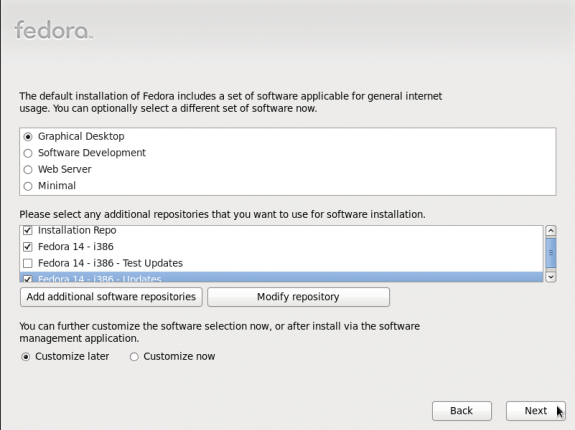
So, pop your Ubuntu 11.10  CD into the drive and boot from it, being aware that this tutorial is also applicable to older versions, such us LTS version of Ubuntu Lucid Lynx 10.04, as long as they offer GRUB 2. When you arrive at the partitioning screen, it will let you know it found another OS installed so choose "Install Ubuntu alongside", and the next screen should look like this:
Ubuntu partitioner
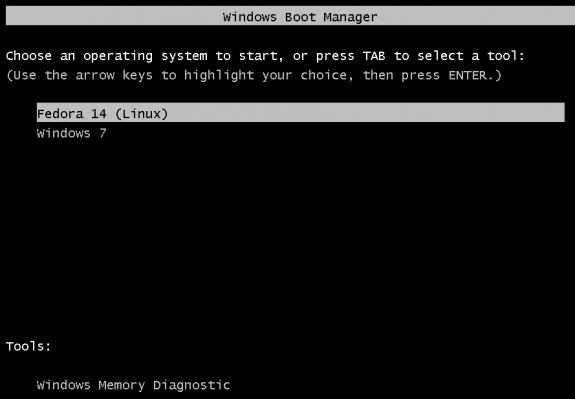
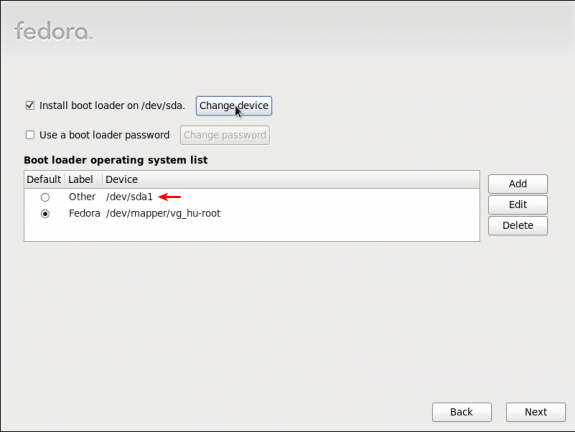
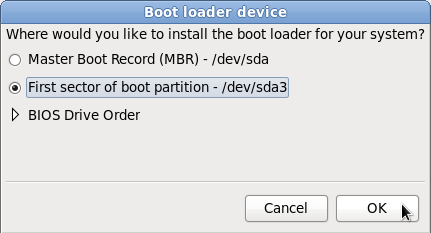
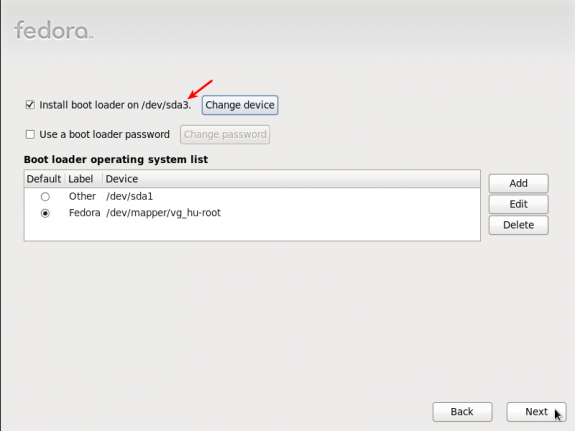
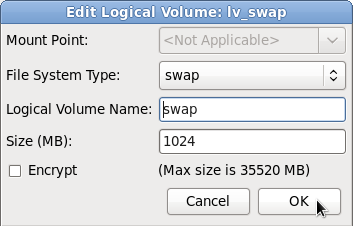
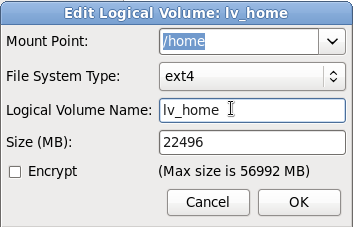
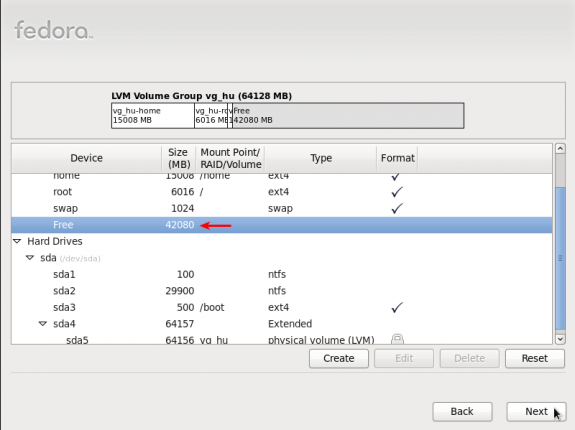
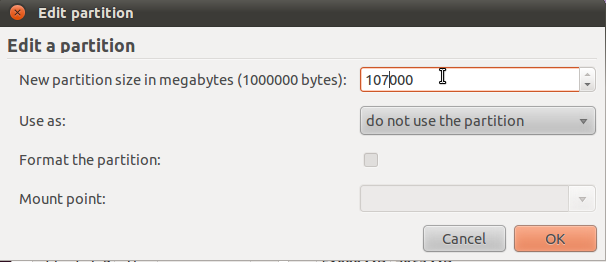
So, use "Add" for creating that bootable /boot or / partition I was telling you about, don't forget a swap partition and continue with some other partitions if you need them, but make sure the aforementioned partition is primary and marked as bootable. Ubuntu will install GRUB inside the MBR when you choose /dev/sda as its' target (yes, this setup assumes a single disk machine), which will detect the Windows boot code automatically and create an entry in its' menu, as you see below:
Ubuntu GRUB screen
When trying dual-booting Windows 7 and Debian testing, although at install the installer told me it detected Windows, at first boot there wasn't an entry. All I has to do was run "update-grub" as root and problem solved. This applies to distributions using GRUB 2, which seem to form the majority nowadays. On legacy GRUB, just create an entry in menu.lst to instruct GRUB to chainload Windows, and you should be set. Here's an example entry considering that Windows is, as is in our example, installed on sda1:
(1) Windows
title Windows 7 x86
rootnoverify (hd0,0)
makeactive
+1
chainloade r
As with old and tried LiLO, yes, it can boot Windows with no problem. Here's what I found as an example lilo.conf:
boot = /dev/sda
timeout = 10
lt = L
prompt defa uinux vga = normal
map insta
read-only map=/boot /ll=/boot/boot.b
inuz-2.6.32-20 label = Linux i
image = /boot/vm lnitrd = /boot/initrd-2.6.32-20.img
label = Windows
root = /dev/sda3 other = /dev/sda1
7
Remember to run lilo after altering the configuration file and reboot. You'll find the Windows entry right there.

5. Conclusion

As you can see, with Linux distributions becoming more and more friendly to the neophyte, dual-booting isn't the nightmare it used to be. However, if you have the means, try installing the two OSs to separate hard drives (I used to work on a Windows 7 box in the past and that thing ate disk space like a kid eating candy, believe me) or even better, separate systems. But if you can't, we just hope this article will help you accomplish your task seamlessly.

6. Famous last words

As I have noticed, there are cases when GRUB 2 doesn't detect your Windows 7 at all, regardless of the incantations or sacrifices to unholy deities you might make. What you need to do is calm down, write a small text file , update GRUB and reboot. GRUB 2, as opposed to legacy GRUB, isn't that consistent with numbering partitions and disks. While legacy GRUB starts numbering from 0, partitions and disks alike, GRUB 2 thinks it's smarter and numbers disks from 0 and partitions from 1 (nice touch). So, if you look above to the legacy GRUB example, there the first partition of the first disk, where Windows boots from in our example, is (hd0,0). In GRUB 2 that would be (hd0,1). Trust me, remembering this will help you a lot at the wee hours in the morning.
Let's start: create a file in /etc/grub.d/ named 12_windows7 (only the number counts, as it will set the order Windows will have in the boot menu) and write this in it:
#! /bin/sh -e
echo “Adding Windows” >&2
cat << EOF
Windows 7″ { set root=(
menuentry “hd0,1) chainloader +1 }
EOF
Save the file and close the editor, make sure that the file is executable with "chmod a+x ... " , of course run "update-grub" and reboot. Voila.

From : http://dual-boot-linux.blogspot.com/2012/04/dual-boot-ubuntu-and-windows-7.html
More aboutDual boot Ubuntu and Windows 7

Step-By-Step Instructions to Create a Dual-Boot System

Diposting oleh Unknown

Okay, now that I've sufficiently confuzled you, here's the simple, step-by-step version of my advice.

I'm going to assume that you're using one big hard drive, which will be partitioned into three sections: One for the Windows system, one for the Linux system, and one big partition for shared data. If you want to use multiple hard drives or some other partitioning scheme, you can ask for specific advice in the Forum.
  1. Use a big hard drive (at least 500 GB is recommended - 750GB or 1TB would be even better) so each system will have plenty of room, and there will be plenty of room for documents and data.
  2. Windows will be installed on the first partition because that's where Windows wants to be installed, and it gets cranky when it's installed elsewhere. (Linux, on the other hand, is more laid-back and doesn't care very much where it's installed.)
  3. Boot to your Windows installation CD with the drive unpartitioned. When you get to the part where Windows wants to know where to install itself, create a single NTFS partition at the beginning of the drive.

    If you're going to be creating a separate data partition (which I recommend), then a partition size of 100GB should be enough for Windows and its programs. But if you plan to install a lot of games, desktop publishing, graphics design, or Web development applications, you probably should make the Windows system partition a little bigger because those type of apps tend to be big and to include a lot of graphics files in their program directories.
  4. Let the installer finish installing Windows on the single partition you just created.
  5. After Windows installs and reboots, activate it, install any additional needed drivers, and download all the available Windows updates. This may require quite some time and several reboots. (You can wait until after the Linux system is installed before installing the Windows updates, if you like; but then if Windows vomits on an update, it may be harder to fix once the dual-boot configuration is in place.)
  6. Once all the updates are installed, from within Windows, create a new partition on the hard drive for the shared data and give it a name (like "My Stuff," for example).

    Make this partition big. How big? Well, basically subtract the space you'll need for your Linux installation from however much space is available on the drive, and create a partition of that size. So if you have 400 GB of free space, and you want to give Linux 100 GB, then make the shared data partition 300 GB.
  7. When the new partition has been created, map your libraries to the new partition. This will establish the new partition as the place to store your stuff, if you do it correctly.
  8. Reboot the machine into Windows and log into your Windows user account. Wait until the machine hascompletely started, and then shut it down. This is to insure that the changes you just made have been saved to the registry.
  9. Boot into your Linux installation CD or DVD. There will be some obvious link or button to click to install Linux. If you're pretty sure that all your hardware is supported in Linux, then just click that button. If not, then look for a link or button that says "Try Linux," "Run Live CD," or some such thing. If available with your distro, this will boot Linux without actually installing it. (This option is available with Ubuntu, Mepis, Knoppix, Fedora, and many other Linux distributions, but not all of them.)
  10. Once you have decided to install, start the Linux installer.
  11. Early on in the installation process, the Linux installer will ask you where to install Linux. You'll be offered several options, one of which should be to use the unused hard drive space. That's the option you want.
  12. You'll be asked what Linux partitions you want to create. Unless you're already familiar with Linux partitioning, I suggest you create only two: "/" and "swap." The swap partition should be at least 1.5 times the amount of installed RAM. The / partition should consume the rest of the unused space.

    Unless you're an experienced Linux user with a reason to want a particular file system, I suggest that you use whatever default file system the distribution recommends for the / partition.
  13. You probably will be asked to create a "root" or "administrator" account and password, and a user account and password. Make your user account name in Linux the same as you chose in Windows, and you have a better chance of the installer finding your Windows data partition.
  14. If the installer recognizes the shared data partition you created under Windows, and offers to make it available to you in Linux, say yes. If it doesn't, no big deal. You can link it later from within Linux.
  15. At some point you will be asked to configure a bootloader (usually LILO or GRUB) and write it to the MBR. The most important thing to do here is to make sure that the bootloader the installer is proposing has recognized and offered to boot both your Windows and Linux systems. This almost always happens without a hitch, but make sure anyway.

    By default, the bootloader usually will include other options, such as booting into Linux repair mode, or the CD or floppy drive. Leave those options in place, as well. They could come in handy.
  16. You also will be offered the option of which system should be the default operating system. Most times, Linux will choose itself, but you can override it if you like. The default operating system is the one that will boot if you turn on the computer and do nothing else. (When you want to boot to the non-default operating system, you just have to hit the up or down arrow button on your keyboard to highlight the OS you want, and then hit enter.)

    Finally, you'll most likely be offered the option of how long the system should wait before booting the default OS. The time the installer will suggest may range from ten to 30 seconds. That's how much time the system will give you to decide whether to hit the up or down arrow to override booting the default OS.
  17. Once you're sure that the bootloader recognizes all of the systems and that the options are what you want, click the button or link to "write," "save," or "commit" the bootloader to the MBR.
  18. Depending on your Linux distribution, there may be some other steps, which should be quite self-explanatory. Once the installer announces that it is finished, remove the installation media (if instructed) and boot into Linux. Log into your account and download whatever updates for itself it finds, then reboot back into Linux to make sure that any changes have been fully configured.
And that's that. You now have a dual-boot, Windows / Linux computer. But there are some caveats.
If at any time a Windows update, service pack, or repair install overwrites the MBR with its own bootloader, you will no longer be able to boot your Linux system. In the past, we used to create emergency boot floppies to fix this problem. Nowadays, most Linux distributions include this functionality on the installation CD or DVD. It's usually called "Repair Mode" or some such thing, and one of the first things it looks for is a broken bootloader.
More aboutStep-By-Step Instructions to Create a Dual-Boot System